Flask tutorial #3: Forms
This tutorial is part of a series on building a Flask web application. For context, please refer to other blogs in this series:
- Flask Tutorial #0: Build a Flask web app with me
- Flask Tutorial #1: Getting started
- Flask Tutorial #2: Templates
In this tutorial, we will focus on building web forms, specifically a login form to use for logging into the application.
Handling user input through web forms is a common requirement in web applications. To simplify the process in our Flask app, we will utilize the Flask-WTF extension.
Flask extensions are packages that provide extra functionality to Flask applications. They are like plug-ins that provide ready made solutions for common tasks and can be installed like regular python packages.
To get started, let us install Flask-WTF in our virtual environment using pip.
(venv)$ pip install flask-wtfThe Flask-WTF requires a SECRET_KEY for security reason, primarily to protect against Cross Site Request Forgery (CSRF) attacks. CSRF is a type of web security vulnerability when an attacker tricks a user’s browser into performing unwanted actions on a trusted website. Flask-WTF uses the secret key to generate a unique CSRF token for each form. This token is included in the form as a hidden field and is also stored in the user’s session. When the form is submitted, Flask-WTF compares the token in the form with the token in the session. If they don’t match, the request is rejected.
By default, Flask-WTF uses the SECRET_KEY of the flask application for CSRF protection. To set the SECRET_KEY configuration, we will create a configuration class in a separate python module.
smartcookielearner/config.py
import os

class Config:
  SECRET_KEY = os.environ.get('SECRET_KEY')
We will then set the SECRET_KEY as an environment variable in the terminal.
(venv)$ export SECRET_KEY = 'your_secret_key'Now that we have the config file, we need to tell Flask to read and apply it. This can be done after the Flask application instance is created in __init__.py file.
from flask import Flask
from config import Config

app = Flask(__name__)
app.config.from_object(Config)

from app import routes
The app.config is a dictionary like object that stores the configuration values of the flask application. from_object is a method that takes the Config object and copies its attributes into the app.config dictionary.
User Login form
In Flask-WTF, web forms are structured as Python classes. This means you define a class for each form, and the fields of the form are represented as variables within that class.
Let’s create a new file forms.py to store the classes for the web forms.
smartcookielearner/smartcookie/forms.py
from flask_wtf import FlaskForm
from wtforms import StringField, PasswordField,
      BooleanField, SubmitField
from wtforms.validators import DataRequired

class LoginForm(FlaskForm):
    username = StringField('Username',
                  validators=[DataRequired()])
    password = PasswordField('Password',
                  validators=[DataRequired()])
    remember_me = BooleanField('Remember Me')
    submit = SubmitField('Sign In')
FlaskForm is the base class for creating web forms in Flask-wtf. It provides the necessary functionality for integrating WTforms with Flask. The various classes from the wtforms library represent the different types of form fields.
StringField: For text input fields (eg. username, email)PasswordField: For password field (masks the input)BooleanField: For checkboxes (represents a true/false value)SubmitField: For the submit button
Validators are used to enforce rules on form fields, such as requiring that a field is not empty.
We define a new class LoginForm that inherits from FlaskForm and this class represents the login form. For each of the field type, an object is created as a class variable in the LoginForm class.
To display our login form on a web page, we need to integrate it into an HTML template. The fields we defined in our LoginForm class already know how to render themselves in HTML.
Login form template
Let’s define the login template.
smartcookielearner/smartcookie/templates/login.html
{% extends "base.html" %}

{% block content %}
    <h1>Sign In</h1>
    <form action="" method="post" novalidate>
        {{ form.hidden_tag() }}
        <p>
            {{ form.username.label }}<br>
            {{ form.username(size=32) }}
        </p>
        <p>
            {{ form.password.label }}<br>
            {{ form.password(size=32) }}
        </p>
        <p>{{ form.remember_me() }} {{ form.remember_me.label }}</p>
        <p>{{ form.submit() }}</p>
    </form>
{% endblock %}
In the login template, we use the HTML form element which is used to collect user input.
The action="" specifies where the form data should be sent when the form is submitted. An empty string means the data will be sent to the same URL that displayed the form.
The HTTP method POST is used to send the form data to the server. POST is the preferred method for sensitive data like login credentials because it sends the data in the body of the HTTP request, rather than include it in the URL as the GET method does. This keeps the data more secure and avoids cluttering the browser’s address bar.
The novalidate attribute tells the web browser to disable its built in form validation. Normally, browsers perform basic checks like required fields before submitting a form. By using novalidate , you are indicating that you will handle all form validation on the server side with your flask application.
form.hidden_tag() generates a hidden field with a special token that protects the form against CSRF attacks. As long as we have a SECRET_KEY defined in our Flask configuration, Flask-WTF will handle the CSRF protection automatically.
You might notice this template doesn’t directly include HTML input elements. That’s because our LoginForm fields already know how to render themselves as HTML. We simply use Jinja templating syntax like {{ form.username.label }} and {{ form.username() }} to place labels and input fields where needed. We can even customize these fields – for example, we've set the size attribute for the username and password fields to control their width.
Forms view function
The next step is to add a new view function for Login.
smartcookielearner/smartcookie/routes.py
from flask import render_template
from smartcookie import app
from smartcookie.forms import LoginForm

@app.route('/login')
def login():
  form = LoginForm()
  return render_template('login.html', title='Sign in', form=form)
Let us also add the login link to the home page.
<div>
  Smart cookie learner:
  <a href="/index">Home</a>
  <a href="/login">Login</a>
</div>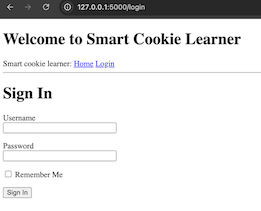
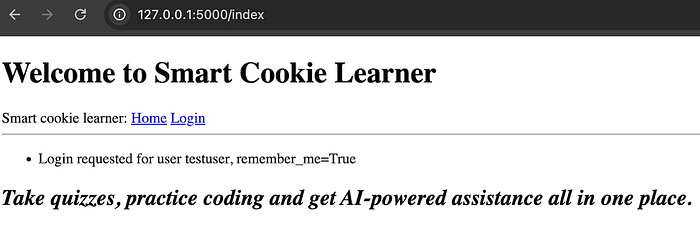
Form handling
We now need to modify our login function to handle the data submitted in the login form.
from flask import render_template, flash, redirect

@app.route('/login', methods=['GET', 'POST'])
def login():
    form = LoginForm()
    if form.validate_on_submit():
        flash('Login requested for user {}, remember_me={}'.format(
            form.username.data, form.remember_me.data))
        return redirect('/index')
    return render_template('login.html', title='Sign In', form=form)
We modify the @app.route to use both GET and POST requests.
The form.validate_on_submit() checks if the form was submitted and if all the validation checks passed. If the form is valid, we display a message to the user using the flash() function indicating the submitted username and whether they checked the Remember me box. After a successful login, we redirect the user to the /index page. If the form was not submitted or if the validation failed, we render the login.html page.
In order for the flashed messages to show on the webpage, we need to update the template page with the flash messages.
<!doctype html>
<html>
    <head>
        {% if title %}
        <title>{{ title }} - Smart Cookie Learner</title>
        {% else %}
        <title>Smart Cookie Learner</title>
        {% endif %}
    </head>
    <body>
        <h1>Welcome to Smart Cookie Learner</h1>
        <div>
            Smart cookie learner:
            <a href="/index">Home</a>  <a href="/login">Login</a>
        </div>
        <hr>
        {% with messages = get_flashed_messages() %}
        {% if messages %}
        <ul>
            {% for message in messages %}
            <li>{{ message }}</li>
            {% endfor %}
        </ul>
        {% endif %}
        {% endwith %}
        {% block content %}
        {% endblock content %}
    </body>
</head>
</html>
This modified template retrieves the flashed messages from the session and displays them in an unordered list on the web page. The get_flashed_messages is a Flask function that retrieves any flashed message stored in the current session. The following if condition checks if messages has any content and displays them as a list item.
Now, when a user submits a username and password, we see the below message flashed on the index page.
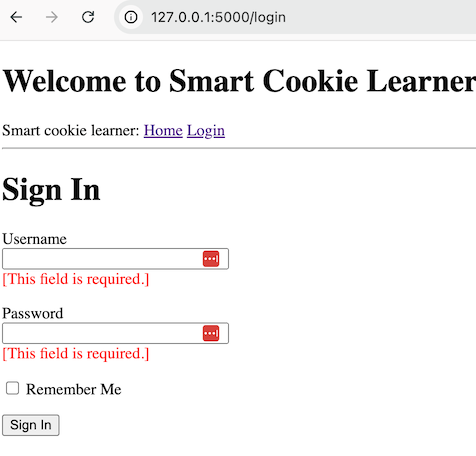
However, we do not show any error message if a user hits the submit button without entering the username or password. To show the error messages on the web page, we need to add them to the login template.
smartcookielearner/smartcookie/templates/login.html
{% extends "base.html" %}

{% block content %}
    <h1>Sign In</h1>
    <form action="" method="post" novalidate>
        {{ form.hidden_tag() }}
        <p>
            {{ form.username.label }}<br>
            {{ form.username(size=32) }}<br>
            {% for error in form.username.errors %}
            <span style="color: red;">[{{ error }}]</span>
            {% endfor %}
        </p>
        <p>
            {{ form.password.label }}<br>
            {{ form.password(size=32) }}<br>
            {% for error in form.password.errors %}
            <span style="color: red;">[{{ error }}]</span>
            {% endfor %}
        </p>
        <p>{{ form.remember_me() }} {{ form.remember_me.label }}</p>
        <p>{{ form.submit() }}</p>
    </form>
{% endblock %}
We add for loops that iterates through any errors that occurred during the validation of the username and password fields in the form and display the error message in red.
URL mapping using url_for()
It is a good practice to not hard code the urls in the templates and redirects. url_for()is a very helpful function in Flask templates that allows to generate URLs dynamically by creating links based on the names of the view functions. You provide the name of the view function as the first argument to url_for(). Flask uses its internal routing system to map the function name to the corresponding URL.
Here is the updated base.html using the url_for function for links.
<div>
  Smart cookie learner:
  <a href="{{ url_for('index') }}">Home</a>
  <a href="{{ url_for('login') }}">Login</a>
</div>
We have now completed implementing the login form. Complete code can be found in the github repo.